I was asked to give a class one time on storing food in buckets and I definitely could relate to Brian Regan with his cup of dirt , but instead I was more like… “It’s a bucket, with food in it. I call it BUCKET OF FOOD.” Somehow I managed to come up with a few more things to say, and even ran over my 30 minute time limit.
Even though there’s not much to it, I get more questions about how to store food than anything else. It’s something that anyone who is serious about getting food storage needs to think about, because if you’re investing your time and money into food, you want to make sure you’re storing it properly!
The last thing you want when the zombies come is to open up a package of food and find bugs all over it ;)

Our society seems to be so concerned about supersizing everything these days, EXCEPT for food storage. While closets have been expanded to fit every handbag in America, the pantry has been shriveling away, and in some homes it’s practically non-existent. This is one reason, among many, that I LOVE buckets! They have come to the rescue, and have allowed people the option to supersize their food storage, while at the same time using little space.
What Can You Store in Buckets?
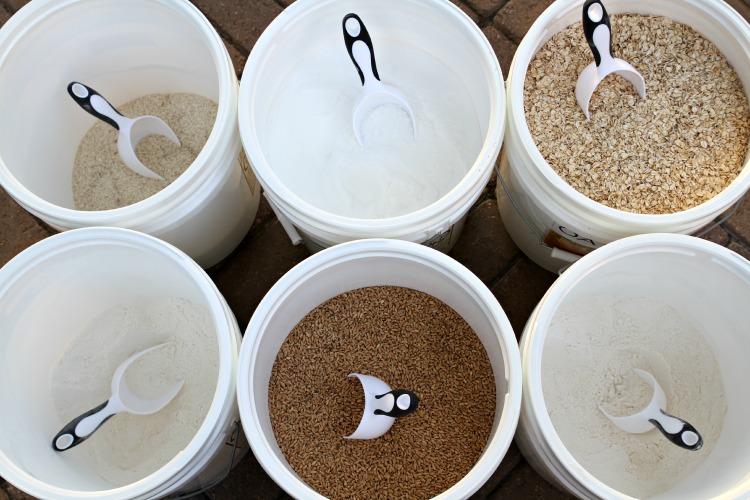
You can store pretty much anything that is dry and sits on the shelf (except your cat, my brother tried), but look below for more ideas. Make sure to stay away from foods with high oil or sugar content; those need to be vacuum-sealed in jars.
I store 5 different type foods in my buckets that you can see below (the ones with the ***). I reserve my buckets for foods I use frequently and need more of. One rule I have that helps me stay organized and rotate my food is that I store each type of food in only ONE type of container. For instance, if I decide to store my flour in buckets, I DON’T then go store it in #10 cans, flour bags, etc. By storing food in one type of container it helps keep things rotating well in my food storage system.
For food items that I use less of, I store mainly in #10 cans – like my beans, popcorn, hot chocolate, and freeze-dried foods. But if you use a lot of those items in your home, you might want to go ahead and use buckets.
Anyways, hopefully that made some sense, just figure out a system that works best for you!
How Much Do You Need?
Now the fun part! You get to pull out your calculator and give your brain a workout. You first need to figure out how much food you want, then you can figure out how many buckets you’ll need!
Most bulk food you find is in 25 or even sometimes 50 pound bags. So if you needed 100 lbs of oats, you would need 5 buckets & 4 (25lb) bags of oats. Here’s some of the best estimates I could find, so figure out your plan and good luck with the math!
FOOD ITEM | #10 CAN | 5 GALLON BUCKET |
*** Wheat | 5 lbs | 37 lbs – (12 buckets) |
*** Oats | 2.5 lbs | 20 lbs – (6 buckets) |
*** Rice | 5.3 lbs | 36 lbs – (4 buckets) |
*** Sugar | 5.7 lbs | 35 lbs – (6 buckets) |
*** Flour | 4.5 lbs | 33 lbs – (8 buckets) |
Popcorn | 5 lbs | 37 lbs |
Macaroni | 3.1 lbs | 21 lbs |
Beans | 5.6 lbs | 35 lbs |
Brown Sugar | 4.5 lbs | 33 lbs |
Powdered Milk | 3 lbs | 29 lbs |
*** I’m feeling extra nice so I went ahead and put exactly what buckets I have and how many of each. So if you don’t want to bother with figuring out the math right now and just want to get started, you are welcome to copy what I have (or get more or less). This amount of food makes a loaf of bread everyday and compliments my meal plan that has enough food to feed my family of 6 for a year. I ended with 36 buckets total (not including the 5 in the pantry).
Options for Storing Food in Buckets:
There are various ways you can store food into buckets, but I’ll talk briefly about the top 3 and let you choose.
1- Do Nothing
This method involves just that, you don’t do anything. You just put the food in the bucket and put the lid on (ok, maybe you do a little). If you’re rotating through your food on a regular basis (probably at least every 5 years), then you can maybe get away with doing this. You need to make sure the bucket and lid you use are sealed on properly to keep as much air, light and bugs out. The bucket only provides one layer of protection against the elements, so it’s not the most trusted way of storing food, especially long-term.
2- Dry Ice
This way is similar to using oxygen absorbers, but instead you are using dry ice. It’s a little cheaper and can kill off insect eggs at the same time, but it can be somewhat tricky. You want to make sure it’s done properly so you don’t have the opposite effect and leave a puddle of water at the bottom of your bucket instead. You only need about 1 ounce of dry ice per 1 gallon container, so if you’re up for some experimenting and playing with dry ice, feel free to give it a try. I just didn’t want to take a chance on all the food I had just invested in!
3- Mylar Bags w/ Oxygen Absorbers
This is the method I prefer and the one the pros use. Most companies you buy pre-packaged buckets of food do it this way. Plastic buckets alone are slightly porous and will still allow for air to transfer through them. Using Mylar bags with buckets cuts the oxygen down to almost nothing, helping to preserve your food for 25+ years.
For instructions, look below.
Storing Food in Buckets w/ Mylar Bags:
Gather your supplies. If you’re feeling extra energetic and want to hunt down leftover buckets from bakeries, restaurants, grocery stores, you can get them for FREE! I’m lazy, and I like them to all look exactly the same, so I got most my stuff from the links below and from Baytec Containers.
1- Get Your Supplies:
- BUCKETS – You want food grade buckets.
- MYLAR BAGS – 20″ x 30″ bag
- OXYGEN ABSORBERS – 2000 cc for a 5 gallon bucket
- SEALER – You can use a hand-held sealer, iron, or flat-iron.
- GAMMA LIDS – I use these only on my 5 buckets in the pantry.
- REGULAR LIDS – I use these lids on all my buckets, except in the pantry.
- RUBBER MALLET – Used to beat the lid on the bucket.
- BUCKET OPENER – Helps take the lid off when you’re ready.
- BULK FOOD – To fill your buckets.
2- Put Your Mylar Bag into the Bucket:
I prefer 5 gallon buckets, but you can use smaller containers if that’s too heavy, or if you don’t need as much food. If you’re extra buff you can impress us and get 6+ gallon containers, just don’t say I didn’t warn you! They can get extremely heavy, so 5 gallon is my max.
Once you have your bucket, get a mylar bag that fits the size container you are using and put it inside. Mylar bags gives an extra layer of protection that keeps the oxygen, light, humidity and pests out. Anytime someone tells me they had a bug infestation in their food I ask if they used a mylar bag and the answer is always NO, so don’t disregard these bad boys. These bags combined with the bucket, make it nearly impossible for critters to get in.

3- Put Food Into the Mylar Bag:
You may want a helper for this part, preferably not one dripping in ice cream ;) I’ve never had one, but I’ve dreamt about how I would boss one around, especially as I’m pouring 50 lb bags of food into mylar bags while trying not to spill it all on the floor! Maybe one day…
Anyways, fill the bag up as full as you can, just make sure to leave room so you can put the lid on!

4- Add an Oxygen Absorber:
Do not add an oxygen absorber until you’re ready to seal! As soon as you open up a package of oxygen absorbers they start doing what they do best, absorbing oxygen. Make sure to have all your buckets ready to go with the mylar bags and food inside before you even think of opening the package up. As soon as they are opened, get ready to run around crazy throwing them into all your buckets. The goal is to have all your buckets sealed within about 10-20 minutes after opening the absorbers so they can have the maximum impact possible.
DO NOT USE OXYGEN ABSORBERS WITH SUGAR (unless you like eating bricks)

*For a 5 gallon bucket use a 2000 cc oxygen absorber or you can use 5 of the 300 cc ones.
Size Container | Oxygen Absorber Needed |
| Quart Jar or 32 oz container | 100 cc |
| #10 can or 1-gallon container | 300 cc |
| 5 or 6 gallon bucket | 1500cc – 2000cc |
If you’re planning on using the leftover oxygen absorbers, you want to make sure you seal those back up ASAP. Often times I use the package they came in and re-seal it with my hand-held sealer, or you can repackage them in a vacuum-sealed bag, or store them in an appropriate sized canning jar with a tight-fitting lid. If possible, try to buy smaller packages of oxygen absorbers so they can be used all at once.
5- Seal the Mylar Bag
Once the bag is filled and the oxygen absorber is added, it’s time to seal the mylar bag. I went ahead and bought a hand-held sealer, which I love! Best birthday present I’ve bought myself so far. You just go along the very top edge of the bag and melt the bag together to form an airtight seal. I leave a little opening at the end, squish as much air out as possible, and then finish sealing the corner.
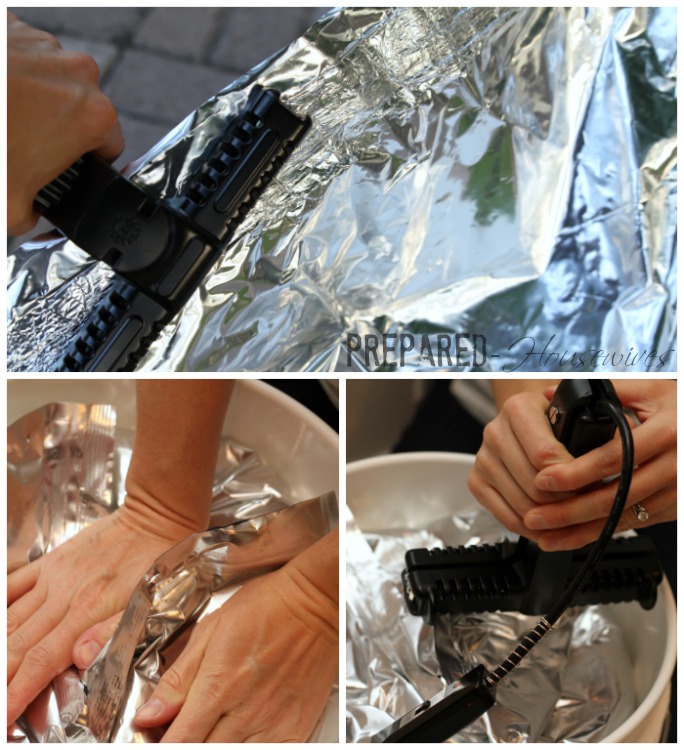
You don’t have to wait until your birthday to buy yourself a hand-held sealer – a clothes iron, or even a flat-iron you use for your hair will do the trick. Just lay a board on top of the bucket, lay the bag on top, and iron away! You might want to cut a strip of the bag off to test beforehand to get the correct temperature setting, or if your impatient like I am, just go for it.

Make sure your bag is completely sealed, you don’t want any air creeping in. If the temperature is too high it will destroy the strength of the bag, but if it’s too cool the seam will pull apart fairly easy.

The bag may seem monstrous for the bucket, but that’s good. If you seal close to the top edge of the bag (above is an awful example), you can cut right below the seal when you open it and REUSE the bag! It can be reused over and over again, all you need to replace is the oxygen absorber.
6- Beat the Lid in Place
You can try to tap the lid in place, but until you lose control and start beating the crap out of it, the lid isn’t going anywhere. This is a great project to do after you’ve walked in on your boys while they’re painting themselves to look like Darth Vader and giving their room a Death Star makeover!

Gamma vs Regular Lids: Which Lid Should You Use?
GAMMA LIDS – These twist on lids allow for easy access to the contents of your bucket which is one reason I prefer to put these on the buckets I have in my pantry. I can quickly twist the lid off to get the food out and then twist it back on. Some people put these on all their buckets, but the main issue is they are more expensive! They usually run about $4-6 more than regular lids, which can add up fast when buying 30+ buckets!
REGULAR LIDS – I prefer these for most my buckets because they are cheaper, stack easy, and create a good seal. If you are needing to get into your bucket often though, definitely go with the gamma lid if possible.
7- Label Buckets
I spent 2 hours peeling labels off my sister’s buckets, because we had to refill them and they needed a new year. After that, I had a brilliant idea! Instead of always needing to put a whole new label on, why not just put the year on some easy to remove tape. Ingenious, I know!!!
Since I already did the math and figured out what I want in each of my buckets, I went ahead and printed labels with the food item for each bucket. I don’t plan on changing the contents of the bucket so I went ahead and made sure to tape it on good! The year is changing every time it’s re-filled though, so I put the year on a separate piece of tape! Now I won’t ever be scraping tape and labels off buckets again! Maybe it doesn’t look as nice, but at least it won’t take me 2 hours to change the date!

8 – Store in a Cool/Dry/Dark Place :)
Just like everything else, you want to store your food in the coolest, driest, and darkest place you can find. This is sometimes where you have to be creative and maybe even consider storing some under the bed. When storing, you want to make sure they’re off the ground (so air can flow underneath), and I’m told you don’t want to stack them more than 3 high (they might crack). I like to be a rebel, so mine are stored right on the carpet, and I stack mine 4 high! The biggest concern is making sure they don’t topple over on anyone, especially the kiddos. So whether you decide to follow the rules, or be a rebel, just make sure to be careful!
Opening Your Buckets:
If the bucket lid is new, you’ll need to pull the plastic part off around the lid. Once that is off, use the bucket opener to pry the lid off. Remember to cut as little of the mylar bag as possible if you plan on reusing it. I then take the bag out and pour the food into the corresponding bucket in my pantry.

Using Your Food:
I have 5 buckets in my pantry, which contain ONLY the food I’m currently using. With these buckets, instead of the regular lid, I use the twist-on lids known as Gamma Seal Lids. Mine are all boring white, but you can be fun and get different colors to help keep them organized, or to just add some excitement to your pantry.

Other Options:
Some other options with storing food is putting multiple smaller mylar bags into one bucket. I don’t necessarily promote this method, because there’s a lot of wasted space and it’s hard to rotate, but I’ve had many people mention they do it.
I prefer to put smaller mylar bags of food into crates or boxes that allow for more bags and are easier to rotate. These smaller mylar bags can be purchased from places like the LDS Canneries and are a great option to use for storing smaller quantities of food like – brown sugar, powdered sugar, spaghetti, etc.

Don’t let me squish your ideas or creativity, have fun and come up with your own ways to supersize your food storage! Just make sure you share your ideas with the rest of us!!!
Is there a method or way you like to store food long-term?

I love it that even in a good situation, you find ways to rebel! :-)
You’re hilarious! I have to find a way to rebel somehow ;)
First, you are beautiful!! But, that’s not why I was planning on posting. ;). I went and bought a bunch of white and wheat floor and threw it into 5 gallon buckets. I’m not sure I can afford Mylar bags for each food item :(. How pricey are they? How long can food (including flour) last in 5 gallon buckets? So I should have done more wheat and less flour… Thanks for the help in advance your web page is awesome and yes haha I find myself beating up my lids often! ;)
One more q, do you find yourself making everything from Scratch in order to afford saving a little food storage? I do! Lol. But it’s nice, healthy and tasty so I can’t complain ;)
Thanks! You’re too kind!
I think mylar bags are about $1-2 each, but if you seal close to the top you should be able to reuse them over and over.
Flour lasts up to 10 years, and wheat 30+. Take a look at the chart above and it shows some of the common food items and there shelf life is stored properly.
I need to be cooking everything from scratch, I go through phases ;)
Jamie, you’re so cool!!
Thanks! Go ahead and leave anonymous comments on all my posts ;)
Very well written and organized, thank you!
What size mylar bags do you use for your 5 gallon buckets? When I was looking on the website you recommended, for the 5 gallon buckets, they had different size mylar bags, and I wasn’t sure which one to go with.
You want the 20″x30″ size mylar bag. I just ordered a bunch to have on hand, and it’s cheaper to order in bulk too. http://www.bayteccontainers.com/mylar-foil-bag-sealable-20×30.html
I have purchased the larger mylar bags for everything. These can be cut down to make four or six smaller bags. Just seal the edges with your iron or sealer.
:)
Jamie, nice – I really like the pounds to 5 gallons chart. I use 5 gallon buckets to keep all my home canning and store bought canned goods in as well as anything in a package – makes it easier to stack/store and keeps the moisture away from the cans. I use 5 gallon. Corny kegs for anything loose. The kegs are SS and easily purged with CO2 or Nitrogen and once sealed hold a pressure. I have around 70 of these so far and am always looking on Craig’s List for more.
You should send some pics of the kegs you are using, I’ve got to see this! Love the idea, maybe I’ll have to go keg shopping too!
Very nice and informative article, Thanks! We use the bucket/mylar/oxygen absorber-system and are very pleased with the storage, capacity and stacking ability. We use them for both bulk storage and indivdual packaged item storage as well (ramon noodles, powdered milk, grits, etc. – although space is somewhat compromised). We also use the gamma lids which are excellent and I can assure, if you were to drop an oxygen absorber pack on the outside of the mylar packed food product then close the lid tight, the bucket will implode slightly which proves the gamma lids seal very well.
As a side note, Lowes sells food grade buckets for very cheap (around $3.65 ea) and they’re usually found in the paint supply department.
Hope these ideas contribute and assure readers the benefits of bucket storage, Thanks!
Thanks for sharing your ideas and mentioning the Lowe’s buckets, I forgot about those! They have buckets for a great deal!
Just a quick hello to thank you for the info your are sharing. I am in construction with my husband. We have found the buckets from Lowe’s to not be a better bargain. They don’t have the strength of the buckets from Home Depot or the white food buckets. Please take this into consideration when deciding which bucket to purchase. There is nothing more irritating than lifting a bucket full of product and have the handle rip right off.
Thanks for shedding light on a question I get asked a lot. I know a lot want to save as much money as they can, but sometimes cheaper isn’t better. I’ve always stuck with the food grade buckets because I’m wanting something that will last me for life. I plan on the buckets being a one time purchase!
Also Lowes buckets don’t have a gasket seal while Home Depot’s buckets do!
Really nice job overall in your presentation of the material. I’ll send a link to this site to a few of my less than prepared relatives to show them how easy it is to be prepared.
Definitely, send it their way. I’ll have them brain-washed in no time ;)
Great how-to…Nice and clear instructions for even people like me…lol
Good way to put up a lot of food with little cost and doing it yourself sure beats buying buckets already put together…
So true, it saves a ton packing your own buckets. Thanks for mentioning that!
With my big family I got frustrated on opening a bucket for items needed for a meal then re-sealing it. So when I started the new buckets I put dividers in them…dollar store cutting boards , manilla file folders…etc.
And I filled each divided section with a weeks worth of staples. Spaghetti, macaroni noodles, rice, quinoa and coucous…filled 4 divided sections.
For breakfast I filled 3 sections….oatmeal, pancake mix (in bag) and cream of wheat.
This was also done for lunches. Tuna cans, mayo packets, small jar of pickles , dehydrated onion one section. Peanut butter and jelly another section and one section with fruit cups and snacks.
Now I just have to grab a bucket per meal…lol
Enjoyed reading your blog.
Cindy.
What a clever idea, thanks for sharing!
What a way cool idea, pinning it. We ended up putting up more shelves the hold the food we are storing this is great. One thing we live in Louisiana where summers are just about unbearable and have a problem with storage already, could I keep them out side?
Thanks for sharing on Tuesdays With a Twist.
Thanks for stopping by! I enjoyed reading your bio and appreciate you hosting the link party!
I wouldn’t recommend putting the buckets outside because the food will go bad much faster. If you can, try to put them inside and maybe store other things that won’t go bad outside or in the attic. Storage space can definitely be tricky!
Great info! I haven’t tried this yet. I’ve been oven canning my dried goods for long term storage. I already have the canning jars and it only costs me the electricity to heat the oven.
Thanks so much for sharing on The Creative HomeAcre Hop!
Hope to see you again tomorrow at:
http://www.theselfsufficienthomeacre.com/2013/06/the-creative-homeacre-hop-20.html
My oven uses too much energy and it gets costly.
I started using a jar sealer with the vacuum sealer.
Works great.
I go to my local grocery store…one with deli/bakery and they give away buckets after the product is used. All food grade and I get 3 different sizes.
Any suggestions for storing dog and cat food? Is it too high in oil to store using the bucket/mylar method?
If you’re rotating your the cat and dog food frequently I think just sticking it into buckets would be fine. You probably don’t need to use the mylar bags unless you plan on keeping it for awhile or notice bugs getting into the food. You want to make sure the oil content isn’t more than 10%, which I think you should be ok with dog/cat food, but not sure.
Love this post, thanks. I needed to read more detailed information on how all this works. :) Thank you so much!
I love your blog! You bring a sense of glamour to prepping!
Did you find that it was cheaper to purchase the 50 lb sacks of food, buckets, mylar bags, and absorbers than to buy something direct? For example, I could buy a 50 lb pail of salt (already preserved AND free shipping) for $53. Would I do better to buy the materials and do it myself?
I love it, you just made my day ;) Prepping can be glamorous too!
It saves you ton by packing your own food rather than buying it (even if you do get free shipping). I’ll figure out the cost breakdown and post something later this week!
Great question! Thanks for checking out my blog!
When I had to store all my household things in a storage facility–I bought a bunch of plastic totes with lids to put everything but furniture in–because after my divorce I sold my furniture before I went from one state to another. I found a good way to mark these totes. I bought a roll of white contact paper and used a marker to make tags on them When I found a house–the contact paper peeled of very easy. I not only put what was in them but what room they were to go in so when I moved in all the helpers had to do was take the tote to that room. I was praised for being so organized. But I loved that contact paper and still use it to mark things–being so easy to remove!! I noticed you are using masking tape–I have found that over time sometimes that is hard to remove because it dries up.
Great tips, thanks for sharing! I’ll have to pick up some contact paper and use that next time! You’re right, masking tape over time can be hard to remove too!
I may have posted this before–I label everything with sharpie adnd remove with nail polish remover.
I found that my $178 Brocato flat iron not only gets my wild mane sleek and straight, it also does a wonderful job of sealing mylar bags. :D
Awesome! I’ve heard you could use a flat iron, but have never tried!
Yes, the flat iron is what we use. I have a 1″x4″ board that I rest over the bucket and lay the end of the mylar bag top across it. I usually iron about 1″ of the top then leave just enough to get the suction tube from our Food Saver to pull remaining oxygen out of the bag. (note: we’ve already added dessicant packs into the bag). Once the mylar bag is sucked of remaining oxygen, I finish sealing the mylar bag with the flat iron. I then fold over the remaining flap into the buck and screw my gamma lid tight I’ve opened some of the buckets, and the bags have held air-free for over a year.
Do you also keep bulk dry yeast for your bread baking? Can that be stored the same way?
I buy the 1# blocks of saf instant yeast at sams club and store them in my freezer. They will last about 5 years on the shelf or 10+ years in the freezer. I have about 8 blocks, and that will last me a year if I was cooking everything everyday. –
http://beprepared.com/saf-instant-premium-yeast-16-oz.html?sc=GOOGLE&oc=GOOG051013&gclid=CJi0_Y_ilrkCFbFDMgodSxgAPA
I would not recommend the bucket method for yeast, it will go bad fast.
What about vacuum sealing yeast in mason jars and placing in a cool dark closet??
What a great post! The only place I have enough room for that many buckets is in many garage. Do you think the food would go bad with it getting warm in there in the summers and cool in the winters? Thanks for your help. I’m feeling overwhelmed at getting all my food storage!
It depends where you live, but if possible the garage would be my last resort! I would try the bed first – http://prepared-housewives.com/2013/03/22/the-bed-not-just-for-sleep-sex/
I LOVE this post! Thanks so much for putting it together for people like me! I just have one question. Why don’t you put pasta, like macaroni, in a bucket? We go through so much pasta that it would be nice to have a big bucketful. Just curious if it wouldn’t last? or too oily? Not sure. Thanks!!
Thanks Heidi! You can definitely put pasta in buckets! In the chart I posted above it says you can put about 21 lbs of pasta in a bucket. If that is what you like to eat, go for it!
Spaghetti pasta fits nicely–I laid the bucket on its side and filled that way.
Thank you so much for all of your helpful information. I admire women like you for sharing such valuable information with the rest of us. I have been struggling with food storage, but now I am stoked that I can do this! hahaha. Who would have thought putting food in buckets could get me so excited.
You’re so sweet. It makes it worth sharing info when I get messages like that!
Buckets are so much fun! I’m always coming up with stuff I want to fill them with!
I loved reading this, but I do have a few questions. The lids you used with the pull tabs, are they reusable? I also noticed that the link to the bulk items no longer works. So when I moved on to your meal plan, I noticed in both your deserts and dinners you use 10, what does it quantify to? When you say do not use the oxygen abs orders in sugar, does this mean powdered sugar as well and brown sugar? Once you open the buckets and use the Gamma lid, how long does the food last? Thanks so much I can not wait to do this once I have my own house!! And for my fiance to say lets do it is a bigger thanks!
Wow, I’m impressed, you didn’t miss a thing! Fabulous questions. I think I need to do a whole post on them!
As far as the lids, I go ahead and re-use them because my food is protected with the mylar bag and the lid still makes a good enough seal.
Not sure exactly what you’re asking about the deserts and dinners, but I have 36 dinners x 10 so I have 360 dinners in all. For desserts I have 15 desserts x 10 so I have 150 desserts in all (we can have dessert about 3 x a week)
Sugar – I don’t put oxygen absorber in ANY sugar. You can actually grind sugar down into powdered sugar, or add molasses to sugar to make brown sugar if you don’t want to have to store all 3.
I need to find a good chart for how long food lasts, but a good rule of thumb is try and finish it within a year after opening. I have had some for longer though! You’ll start to notice if it goes bad ;)
Good luck! Congrats on getting the support from your fiancé!
I’ve tried several methods of food storage– I LOVE buckets and #10 cans. Other than my yearly canning, it’s now the ONLY way I store food.
Here’s why: A few years ago, we made a move on very short notice (as in, we packed up our house and WENT in about 2 weeks). The stuff in boxes and bags and canisters was IMPOSSIBLE to pack. I finally got mad and gave most of it away. The canned stuff was easier– we shrink-wrapped flats and stacked them. The buckets were EASY. Carry them out, stack them level, put a piece of plywood after two layers of buckets. EASY.
We unpacked the storage unit 18 months later– all the stuff in buckets was still in PERFECT condition. All the stuff in jars was usable. Dehydrated food?? I guess I didn’t get it dry enough– I’m glad there wasn’t much, because I had to throw it out.
I LOVE those 5-gallon buckets. I use them for ALL dry goods.
I’m so with you! LOVE the buckets! It’s a great option for people that move a lot, or need to go in a hurry! Thanks for sharing your love for them ;)
I am from #1 category–I have 60 buckets and I did nothing.
I have used Lowe’s buckets for 5 years and have found no problem with them even stacked.
My little lid remover works great on them.
Thanks for all your tips and advice Jay Jay!
Great article! I have only used 5 gal food grade buckets (from Lowes) to put smaller sealed mylar bags in. There are only 3 of us, and I worry about opening a huge bucket of something and not being able to use the food before it goes bad. Of course, my daughter and son-in-law have said they’re coming here to be on the “appocolypse team” and bringing his family (5 more) so maybe it’s a good idea! Also, storage is a problem in our 1250 sq ft house. I’ll have to research maybe some smaller buckets that might fit under the bed. I’m already having to do a lot of culling and moving around for the canning that’s started this week with strawberries (we way downsized in Jan, so trying to find room is a problem!).
I actually got what you wrote! How many sites say use O2 absorbers but don’t say what size. Thank you. Oh, nice knowing a gamma lid exists. Practical!
Thanks! That what I was going for! Glad it helped!
Have you tried storing any rice, almond or other alternative flours? I am gluten intolerant so that takes out all the normal flours and wheat :(. I am wanting to get a stock pile for my family.
More and more I cook everything from scratch and I love learning more ways to make things work.
Great question, and something I need to research some more!
Maybe I’m blind LOL but I can’t find the chart with the shelf life on it. Am I missing it somewhere? Thanks :)
Great site! looking to update my food storage, and your information will prove very useful.
Hi Jamie!
I have a question about the pasta container. Do you put it in raw, as in out of bags or if you got it in bulk, or do you keep it in the plastic bags it was bought in?
Hi! Most of my pasta I bought in bulk and packaged it myself in mylar bags – at least the spaghetti. Whenever I open one of the mylar bags of spaghetti I take it out and put it in a plastic pasta container.
As for my pasta noodles though, for right now they are just in the box or container I bought them in. Not the best, but so far so good.
Hopefully that was clear as mud ;)
Where do you find 25 and 50 pound bags of bulk goods?
I usually go to Sams or Costco, or if you live near a LDS Cannery you can get them there too.
So I guess I am confused but when you say 37 lbs- 12 buckets for wheat…does that mean you are putting 37lbs per bucket? Just wanting to make sure. I have the same family size as you do and am trying to figure out exactly how much I should store. Thank you!!
Sorry about that. Yes, it means each bucket holds about 37lbs and for my family I would need 12 of them.
Hi, I love your site and all the great information. I’m new to the food storage concept and am curious about a few things; In the event we will need to survive on our food storage, why don’t I see any of the articles/food storage distributors ever mention storing dried fruits? ( I do see apples). These would be a necessity for proper nutrition. Also, what do we do about resealing the mylar bags if we have no electricity?
Thanks!
Rita
I have a crazy question. I just purchased some 7 lb bags of brown sugar at Sam’s. To put them in the bucket, would I dump them out of the plastic bag it comes in into the mylar bag, and then seal the mylar bag, or, would i just put the whole bag it came in into the mylar bag? (I realize, per your note, that I would not use an oxygen absorber because it’s sugar.) I’m just wondering if, for foods that come in plastic bags, if we are supposed to remove them from the plastic bags before they go into the mylar bag.
That’s actually a great question. I’m not sure how great brown sugar stores. At least what I have is as hard as a rock ;) Personally, I just keep it in the plastic bag so when I need it I can just pull out one bag at a time, instead of try and use a whole bucket.
Another option is you can store molasses and make your own brown sugar as needed.