
Everytime I’ve done an emergency fair, the most popular alternative cooking method that I demonstrate has been the Rocket Stove (by a long shot)! People LOVE this one, including me! It has immediately shot to the top of my FAVORITE’s list and something I recommend EVERYONE should add to their emergency supplies!
Why? Mainly because…
A handful of twigs can cook an ENTIRE MEAL!
And if you use the design below it fits anywhere, only weighs about 1 lb, very portable, easy to use, practically free, great for camping,…. Shall I go on?
No… lets just go ahead and make one!
Grab Some Scraps and Make a ROCKET STOVE!
A huge thanks to Brock, who is an Organic Wellness Doctor by day, and a Rocket Stove engineer by night. I got my first Rocket Stove from him, because lets face it, I was NEVER going to get around to making one.
He was nice enough to let me invite myself over to his workshop and be totally obnoxious with my picture-taking. So make sure to check out his Website – PREMIER ROCKET STOVES, and send him a HUGE THANKS :)

SUPPLIES:
- #10 CAN W/ LID – Recycle one or get one from the cannery.
- 2 LARGE 28oz CANS – Eat lots of beans tonight :)
- EXTRA CAN – You need an extra can to make the shelf.
- INSULATION – Grab some from the attic.
- TIN SNIPS – or anything that can cut metal!
- HEAVY-DUTY GLOVES – So you don’t cut too many fingers off!
- MARKER – To mark where to cut on the can.
- WIRE HANGER – To make the handle with.
- HIGH HEAT SPRAY PAINT – If you want to make it fancy ;)
1- Mark & Cut Center Hole!
With the large #10 can , use a lid from the small can and trace a circle.

Once you get something that could pass as a circle, get to cutting! This is where you get to use your Tin Snips! But if you want live on the edge, pull out a mini saw, don’t wear any safety goggles, use your toes to cut everything, and go to town!!!

Check your tracing skills by seeing if the can fits through the hole you just made.
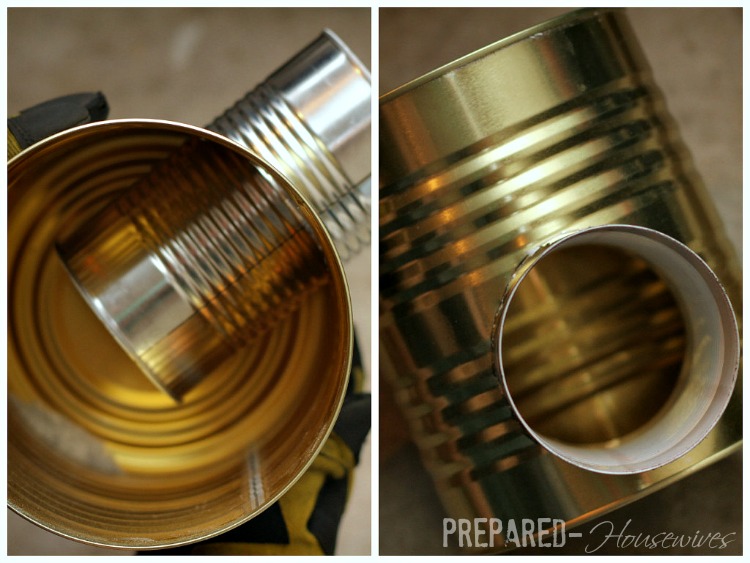
2- Mark & Cut a Hole on the Inside Can
- Now do the same thing. but this time measure and cut the can that will be going INSIDE the #10 can.
- Using the piece you just cut out of the #10 can, place it on top of the smaller can and trace!
- Once you’re ready, let some more sparks fly!

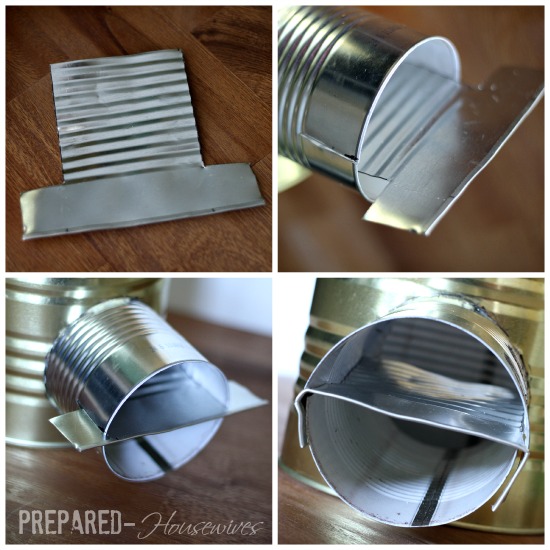
4- Cut and Insert the Last Can
- With the can you haven’t touched yet, cut off the rim first.
- Then make about 1.5 inch tabs around the can. (see picture if I’m not making any sense :)
- Squeeze, smash, squish and do whatever it takes to get it through both cans.
- Fold some of the tabs up to make a snug fit.

5- Cut Lid
- With the top lid, trace a circle in the middle of it using one of the smaller cans.
- Then yes, cut it out.

6-Fill With Insulation!
- First cut tabs around the large can. We cut 8 total, but look below to see approximate spacing.
- Insulate with whatever you want that won’t catch on fire, I just grabbed some insulation from the attic for mine :)
- Pack it in until you can’t fit anymore!
- Fold down 4 tabs, use a hammer if you need to help flatten them.
- Place the lid with the circle cut into it, on top.
- Hammer the remaining 4 tabs on top to secure the lid in place.
- OR – Just look at the pics :)

7-Add a Shelf!
Almost done! Not sure where my pictures disappeared to for this step (maybe the same place as the I-Pad), but you basically use some of the scrap metal and make a shelf!
***Update – I found my pics!!!***
- Cut a rectangle metal piece with flaps that will fit inside.
- Hammer the metal to make if flat if necessary.
- Cut about an inch on each side of the can.
- Slide the shelf into place.
- Fold down flaps.
8- Make a Handle
For a finishing touch add a handle to the rocket stove by using a metal hanger. Drill two small holes and thread a piece of hanger into them and bend it into place.
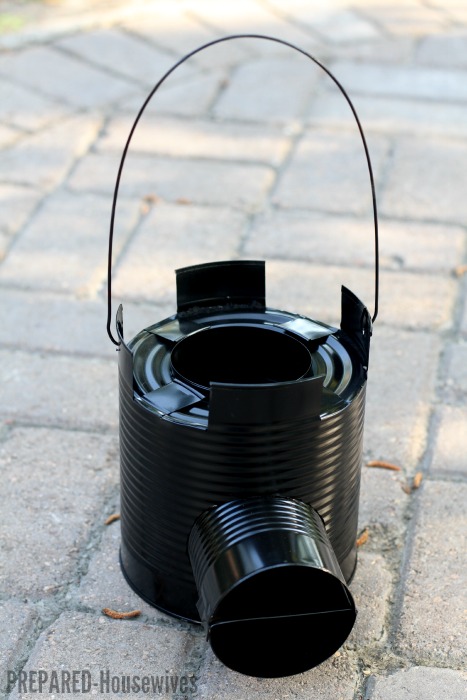
9 – Spray Rocket Stove with High Heat Spray Paint
If you want to be real fancy go ahead and spray your finished rocket stove with some high heat spray paint. It will make your stove look pretty (which is very important :), and helps it to last longer!

10- You’re DONE! Time to Launch!
I usually just cut up some of the scrap wood we have lying around, but use whatever you have that will fit and burn!
- Put some small pieces of wood on the shelf (not under, it needs to breathe)
- Throw some dryer lint in (Save this amazing stuff if you aren’t already :)
- Light it!
- And Poof! If will be up in flames before you know it!

Now COOK with it!
Keep feeding in wood to keep the fire going for as long as you need!

This is sure to WOW anyone you show. So bust it out in your front yard, take it to work, or give it as a teachers’ gift (maybe they can use it to burn some of that ugly apple decor they always get)!
My favorite is to help the kids cook with it and teach them how to make their own dinner!

Hopefully these instructions make sense. Sorry, if there’s a million typos and awful grammar, it’s because I’m typing and editing posts while kids are beating each other with Wii controls. Gotta go!
Remember, if you want to skip the making and get on to the impressing you can just buy one here – PREMIER ROCKET STOVES!
I seriously have a blog crush on you now! I have been drooling over rocket stoves. This would be such a fun project to do with my hubby for a DIY date!
Awesome, my first crush :) What a great DIY date! You’ve given me inspiration for another post!
This awesome,well written!! gonna make my 1st one next week,thanks for taking the time to do this.
LOVE it! I’ve seen so many design ideas, but this is by far my favorite! Can’t wait to try it out.
Awesome! Good luck with it!
Made a couple of these. Yours is much ‘prettier’ though. Amazed at how efficiently they burn. Hardly any smoke or ash left after burning.
Photoshop is wonderful :) I should post a picture of my old one! They are great, especially for something you can make for almost nothing!
Nice, but it’s much easier to just purchase a portable stove for under 50 bucks that breaks down flat for transport. Try carrying this contraption in your bug out bag…
I did’nt realize they had portable stoves that were smaller than a #10 can and could be used with a few sticks. Most of the ones I’ve seen are electric or need propane, and storing enough of that is nearly impossible without making your house a fire hazzard.
I mean no disrespect and your idea is sound but for portability here is one example:
foldingfirebox.com
There are others…
Your idea is better than the foldup box stove i bought yrs ago. I makes it sound like theyre light weight. I rather hang this on my emergency camp bag. Than a 15lb stove and a gas can thatll soon need refills
Thanks for sharing, that’s a great option too. I’ve never seen one that goes flat before. It reminds me a little of the Volcano, which I really like, but a lot smaller and flatter.
This is a cool idea for “truck” camping or leaving cached in your camp…I use an esbit fold up stove for my trips out…they are light and cheap (about $7)…in my world ounces lead to pounds which equals pain…I’ve toyed with the alcohol beer can stoves as well…very WELL written article though…my kids are making these on “hobby day”…
Yeah! Glad you liked it!
Thanks for commenting! I want a hobby day! Great idea!
The fold flat ones are great but some people can only afford to make a stove with free recycled items. Which is why the rocket stove is a great idea, that and people would be more impressed with something someone made more than something someone bought, which I think was one of the main points in this tutorial.
If you are worried about fitting in your bug-out bag, how about putting a carabiner clip on it? Then it could ride on the outside of the bag.
Fabulous idea! I think we put a handle on this one, but I also have one with a key ring. You can definitely put holes in the rim and clip a carbineer on it or whatever you want!
After you use it once though, it definitely get’s dirty, so the only concern is getting black on whatever it touches.
This is awesome!!!!
This is awesome! We have an RV, but we like to cook outside more often than not. I think we need one of these for heating up dinner!
Definitely! They’re just fun too!
What are some easy things to cook with this, is it messy?
I’ll post a couple of our favorite things, but pretty much anything you can cook on a stove. Some of my favorite things I make is popcorn, eggs, and soup. We’ve also cooked 5lbs of hamburger for a cook-out one time too.
Hi,
Thanks for sharing this amazing idea! We live in Florida and were without electricity for 2 weeks one time. There were no gas stations, grocery stores etc during and after the hurricane. This is an amazing little gadget to have on hand and I wonder if My new Dremel could do this!
Cheryl Weaks
Ft. Lauderdale, Fl
Hi Cheryl –
It’s perfect for those emergencies! I love it because it’s so small!
Good luck making one! Hopefully your new Dremel will work like a charm!
As far as being messy, everything’s outside so clean-up is great. After everything is done cooking I just turn it over and dump the ashes and that’s it!
how do you make the fire stop when your done?
It burns out pretty fast, you can also just dump the ashes in a firepit or throw some water in it.
This is AWESOME!! Can’t wait to try it…. or win one?
I can’t see myself making one of these, but I would love to have one!
This is great I will have to try it I love trying to invent something that’s different I have nevet saw one before going to starting following you to see what else you can cone up with. Thanks for sharing.
I won the contest and am happy to say I got the rocket stove recently! Can’t wait to use it this summer :) Thanks Prepared Housewives!!!
Congrats again! Let us know how you like it!
…to impress the boys?….but a guy was doing it in this tutorial….lol
Are you saying I have man-hands ;) You’re right, but if I got him to take the picture there might not be a tutorial to post!
As a Cub Scout (age 8, a very long time ago), we made hobo stoves. A #10 can with vent holes near the cooking surface (the bottom of an opened can) and an opening large enough to slide in a tunafish can with fuel (rolled cardboard drenched in parafin) at the other end. Much easier to make (though not nearly as cool), but equally useful in case of emergencies. A single fuel can could usually cook 3-5 pounds of ground beef, and one doesn’t need a skillet even if cooking a single patty at a time.Fuel cans could be extinguished by flipping them over or putting a lid on them and reused later (or recharged with more parafin and reused). Obviously, one could use briquets or sterno or twigs or just about anything else that burns for fuel if pressed into it. I love your rocket stove idea and might make one just for fun. I am really impressed by how thoroughly burned the twigs are (little ash). Keep up the blog.
Thanks for the info. I’ve seen those and will have to try one of those next. I’ve gotten addicted lately with trying different cooking methods and playing with fire :)
I love the post this was awesome! What dremmel blade is he using to cut the can?
this neet stove to have and make.
This is an amazing contraption! I would love to post your article idea and photos, with all attribution and links back to your site. Would you consider? Thanks!
That is just plain awesome..great ideas!
Ha ha ha kids beating each other with Wii controls. No offense, I am laughing because I completely understand and empathize.
Love this idea must do it. What ingenuity.
I am delighted to have found your site! Plus I have been wanting to build one of these but could never find directions in print, with pictures! The you tube videos are great, but I do not have a computer at home. With a combo of 3rd shift brain freeze, menopause brain, and adult ADD. I’m hopeless unless the directions are right under my nose. My main concern is having a way to cook when the power goes out. And it goes out frequently, not for very long……..yet.
Thank You!
Patti in SW MI
This is the greatest thing I have ever seen! I am gathering my supplies so I can make one this week!
I think it’s pretty great too! Just last week I was too lazy to make a fire to cook smores and so I took the rocket stove out instead and my kids had a blast! Let me know how it goes! Would love to see a picture when you’re done!
Great stuff. Even the other peoples comments were worth reading. Thank you.
Definitely some smart people! I’ve learned a lot from others and their comments too! I’m excited to post something someone just taught me today!
Can you tell me the PURPOSE of the insulation?
It’s to help with the heat, and I think it also helps from the outside getting too hot. The 1st one I did didn’t have any, but the others do and it seemed to get hotter faster. You can also use sand, dirt, rocks, or really anything, or just leave it out. It helps stabilize the cans some too.
Do not equate a good rocket stove with the flat folding units. The key to these stoves is to have a much hotter area around the wood to gasify it. This process called pyrolysis breaks down the wood before burning. Wood starts breaking down at around 300 deg C but really gets going good at temperatures around above 700 degrees Celcius. Then the tars and gases released during this process burn much more efficiently and cleanly with little smoke and less ash. That is the real purpose of the insulation, to keep heat in to heat the wood better.
I appreciate you sharing your expertise! You explained that much better and more detailed than I did! Thanks for stopping by Bill!
Is attic insulation safe to use in the rocket stove (as the insulation)? It seems so fluffy and tinder-like. I think I’ve seen other tutorials that suggested vermiculite or maybe even dirt or sand. Any thoughts? I’m fascinated with the rocket stoves and can’t wait to make one.
Either of those will work fine to use for insulation. I just grabbed some insulation in the attic for mine, but dirt or sand would have probably worked just as good or better.
You can use insulation, However if you do make sure it is a rock wool based not fibreglass. fibreglass will melt, and the ones designed for higher temperatures are treated. I suggest roxul safe n sound, also do not use expanding form as it contains VOC
Thank you for posting, we have linked to it on our site and our followers are already coming over. Keep up the great work.
Best,
The BetterPrepped Team
Thanks for sharing! Love your site! The national debt you have at the bottom is depressing! It’s a good reminder why we need to get our stuff in order, since those looking out for us can’t!
This is excellent, one thing I noticed you used cans with plastic lining on them, if they have that white lining that`s plastic but there are lots of types of cans that don`t have them. Tomato cans will always have a plastic lining.
I just grabbed whatever cans I had, but that’s good you noticed! I would definitely recommend NOT using ones with the plastic lining. Thanks for mentioning!
I use a cast iron griddle on top of mine and makes great pancakes. Really a hit at get-togethers and outdoor breakfasts and picnics.
This method looks GREAT – more portable than the larger version I’m also wanting to try. I recently ‘survived’ a wilderness training weekend, and I noticed we used a LOT of fuel. A stove like this would reduce our footprint AND our wood-gathering time. Thanks – I’m about to pin this!
I want to do a wilderness training weekend! That’s on my bucket list ;) How did you cook your food?
I really do love the rocket stove for that reason. It cuts the fuel and cook time way down.
A better insulator if someone has a wood stove is ash from the wood stove. This can be modified to be used as a heater for the house as well. Look up rocket mass heater.
Also wanted to add that you can achieve faster warm up times by using a pot skirt.
Use to make something similar to this, but would use a tuna fish can and put corrugate cardboard in the tuna fish can and pour melted paraffin wax over it and than once it dried you would use this for the heat source. You would than use the top of the bigger can like a burner on a cooking stove. Or cook directly on it if you need to.
Nicely done stove. One problem is that you need an extra can for the shelf so it would be 3 smaller cans instead of the two pictured. It’s a shame that some people miss the point of this. This stove was conceived to be an emergency use for when the SHTF. You use whatever fuel you have available and that won’t be propane or electricity, it will be twigs. Those same folks need to see a tutorial on how to start a fire without a lighter!!
I went ahead and added an extra can to the materials! Kudos to you for being ultra-observant and catching that ;)
I agree, I want most my alternative cooking methods to not depend on propane or electricity – that kind of defeats the point!
This…is absolutely sweet!!!
Thanks Michael. I think so too ;)
This is amazing! Pinned for later.
Hey, thanks for stopping by Melanie!
Since you used some insulation from your home, I thought people might be interested on the heat limitations of some common insulating material, because some sites say rocket stoves can reach 1800 deg (F). All the info belongs to the creators of the website. I have not confirmed any of them. http://www.engineeringtoolbox.com/insulation-temperatures-d_922.html
Interesting! Thanks for sharing!
Great post! Easy to follow and great photos! I am going to give this a try. I’ve seen some other You Tube videos for Rocket Stoves, but your instructions and photos appear to make the Rocket Stove more stable and well put together. I will likely use sand or fine gravel rather than insulation, but will go by all of your other directions. One question; do you know how long these last before the tin cans break down from the amount of hear being through them? I am assuming it would take several uses, but just thought I would ask. Thanks for posting this! It is good stuff! :-)
Thanks for the compliments Jack!
Good question about the durability. Some of the rocket-stoves we’ve done lately we’ve painted high-heat paint on it and that helps out a lot. My plain metal cans start looking bad fast, but still work great. It depends on if you leave it outside to rust, or take ok care of it. I’ve used mine about 20 times and it doesn’t need any replacing yet.
Sorry, for all the incoherent rambling ;)
Excellent design. I will add one thing. About an inch of sand or rocks in the bottom (just below the insulation around the edge) for stability.
Awesome idea, gonna be making one soon! Well explained and pictures help going over the process! Keep up the great ideas
These plans look great. I’m definitely going to give it a try.
I want to make one of these to use for camping. It’s never difficult to find some twigs out in the woods. I’m just not sure what size a #10 can is, is this like a paint can?
Awesome!
It’s about the size of a large coffee can.
I have looked around. I can’t find 28 oz cans that are tall instead of wide like in the picture. Am I a dunce or is it like that by nature?
Have you checked beans? I think my cans were the baked beans in 28oz cans and they were tall.
Thank you for the pictures and details, it looks like it is very simple to build even with hand tools vs. power tools. I have a re+purposed circular plow disk (they are made of cast iron) that has been turned into a very large wok (3 angle iron legs and 2 handles) that I use while camping for cooking all meals over the campfire. This little rocket stove will be the perfect addition to allow me to cook on my wok when there isn’t a campfire available. I am excited to be able to use my wok anytime now and can’t wait to get my first rocket stove built.
Yes, your hand tools should work fine! I love how light weight it is too! Hopefully, it will work OK with your wok!
My wok stands about 1 foot off the ground so I’m pretty sure the rocket stove will fit underneath without any issue. Lifting the wok off the campfire while hot was always a scary experience (even with gloves) so this should make removing it from the heat so much easier.
Sounds like it will work great! Excited to see hear how it goes!
I will be making one soon!
Awesome! Hope it goes well!
Hey, thanks for the amazing tutorial! I taught a group of ladies at church how to make these last week, based on your tutorial and my fuzzy memories of the ones that we made for Girls Camp at church when I was about 12- and it turned out AMAZING, to say the least! We made them using different sized powdered milk cans, as #10´s and 28 oz´ers are hard to find here in Chile, but they worked awesome! When we finished them, I took one outside with some yeast scones to fry, and everyone looked at me like i was crazy- but we fired it up and within 3 minutes we were frying! And this past weekend we made some amazing fried fish for my mother in law for Mother´s day, and used next to no wood, it was great.
I am going to be doing a write-up of how we made them, with the different sizes and everything, in Spanish, so that people here can see the amazingness in action. Can I borrow your pictures, also linking to you, until I can get my camera to decide it wants to talk to my computer? I will definitely give you credit, I just need pics for my dear friends that don´t speak English! lease let me know, and THANKS!
Woohoo! Thank you for this post!!! I just showed this post to my husband and he is totally intrigued! He says ‘lets make it together’. I can’t wait to build this stove. Thanks again.
That makes me so happy! Have fun making it together! It would go perfect with your blog! You’ll definitely be baking outside the box!
This is soooooo cool, Jamie! I’ve never seen this before. Pinning right now!
One of more ingenuous designs (and simple also) I’ve seen. Thanks for sharing your tutorial. I’ll be passing it along including a link.
I appreciate that! Thanks!
This is so awesome! The main thing I like about this version is the fact that it looks nice and doesn’t have many sharp edges.
I do have a question though. Spraying it with high heat resistant paint will prolong its life, as I understand from your tutorial. But why not spray the complete inside? Isn’t that where it’s life can be prolonged as opposed to just protecting the outside? In other words, isn’t it better to spray paint the inside of the outer tin and the outside of the inner tin, as you cannot reach there anymore once the lid has been sealed?
Just wondering if I need to do this before I finish up mine :D
Kind regards,
Kaas
Great suggestion! Yes, that would be even better if you could spray it before you put it together! We didn’t think of spraying it until after we finished, but maybe I need to change up my steps now.
I know I thought of doing that once but then forgot! Thanks for being two steps ahead of me!
Did you have a hard time tracing the circle on the curved can? It seems tricky to get the circle opening on the #10 can to be accurate.
It was a little tricky. You could probably trace it on a piece of paper first and then use the paper to trace it on the can.
What about using a compass to draw the circle? Poke a hole with a nail and insert the point, then with your compass set to the diameter of the can opening, draw the circle on the big can and do the same for the inside can. Use an eyebrow pencil in place of a regular pencil.
What a great idea! Didn’t think of that!
Looks easy enough.
I’m a general handy man & I like your rocket stove I plan on making a few & bartering them 2 the homeless in my area for empty soda & beer cans for me 2 recycle & they can have warm meals & drinks this winter
Will definitely be building one of these , nicest design I’ve seen. it’s a step up from the ‘conservation stoves’ we make at cub scouts.
Cubmaster at 1st George Cub Pack. South Africa
It Is A Super Stove .Tutorial Is The Most Explicit And Well Explained..Congratulation For This .Work Of Art
Thanks Charlie! You are too kind! I really appreciate it!
I made this stove ( and a smaller version for hiking) and cannot seem to get it burning hot. I’m just not getting the “rocket” draft I need. I followed the instructions exactly but must have done something wrong. Getting a weak flame and hard to keep going. Any ideas on what to check? Not enough wood maybe?
What did you use for the insulation?
You might consider painting it with heat resistant paint if you haven’t already. That might help keep the heat in better.
Also, having enough wood to keep it burning hot would definitely help too. Some may require more wood than others.
I used vermiculite as insulation because I was concerned the fiberglass insulation would melt. I read several others used vermiculite with good results so gave it a shot. I may build another and try the insulation you used. I did paint the stove with high temp grill paint as well. I was using some scrap 1X2’s as fuel and could not load any more wood than was burning. Maybe more pieces of smaller sized wood is better. I will try again. Thanks!
Is the insulation absolutely necessary? I am going to make one because where I live, campfires are prohibited for back country camping, but wood stoves are allowed. I was hoping that a small stove like this might also be used to warm my shelter.
The first one I made and still use doesn’t have insulation, so you should be fine if you don’t sue any.
I’ve never thought of using it to warm a small area, you’ll have to tell me how it goes!
I’m sure it would warm a area, but you do have to think about the smoke… have to use a lot of soup can to use as a chimney. haha…..
True, it would make a room very smokey ;)
Can you use sand as an insulator instead. Not keen on your insulator
Absolutely!
Is there coal at the bottom of the stove? It looks as if there is something black at the bottom in one of your pictures. It may just be the wood burnt? Not sure, but great idea!
There isn’t coal, sometimes I use dryer lint to help get the fire started. Maybe that’s what you saw?
I’ve never heard of a #10 can before. Is that bigger than a gallon of paint? And for that matter, would an empty gallon size can of paint work? The old style, not the new plastic ones, of course.
I’m not sure I have the ambition to do all these steps, but it’s a cool project and would be nice to have an emergency stove.
It’s about the same size as a gallon of paint, you could always give a try if you feel super ambitious one day ;) There are a lot of different versions of rocket stoves you can purchase too.
Good luck!
Does spray-foam insulation work?
Also, I would worry about a top-heavy pot tipping over, especially with beans or something that stays hot if it spills onto skin. I would want the pot’s weight to be supported and not just resting solely on the top of the rocket stove. A large pan might be tippy if the pan were a wider diameter than the stovetop. Have you figured a way to prevent tipping?
I’ve never tried the spray-foam insulation, but it might!
Yes, you definitely want to worry about it tipping over, especially since they are very light. We have used a large pan with ours to brown up some meat; we just make sure to not leave it unattended.
What a great post. Love how you have detailed everything and provided pictures so I can follow along. Never tried to make one of these before but might have to try it tomorrow.
Cheers
Hi, I joined your blog site and I keep getting your pop-ups to ask me to join your group. I went to my email and confirmed and clicked on your link so I’m not sure what’s up. Can you look into this on your end? Thanks…PS: I’m excited to see what you have to offer, looks like fun!!
Hey, sorry for my annoying pop-ups. I’m not sure if there is a way to disable once people sign up, but it hopefully shouldn’t show more than once every 2 weeks. Thanks for letting me know though. I’ll see what I can do!
this is not a real rocket stove , a nice little stove yes , but a rocket stove is built on the bases of the smoke being able to return for a reburn and that is what makes it smokeless , the emmissions get reburned and th air intake is hot and fullunburned gases , if you want this to work like a real smokeless rocket stove , make sure the air can be sucked down between the 2 layers , use loose gravel for an insulator so that it can have air flow , then have an air intake ot the bottom to the fire , once you close the door for the front feed , the fire will draw the smoke down between the two cans carring hot gasses and oxegen , then fire will burn fast , and blue like a tourch , a few minor changes and you will have a smokeless efficient rocket stove that is very inconspicuous !