
Note: This post is part of the Prepared Blogger‘s 30 Days of Preparedness series to celebrate National Preparedness Month.
Day 26: How to Filter and Purify Water for Survival
Water is essential to survival. If there is one survival skill you should learn, I would recommend how to filter and purify water so it’s safe enough to drink. You just never know when you might end up in the woods by yourself with dirty water, hopefully never, but it can happen ;)
There are so many different definitions and ways on how to filter and purify water, but I’ll try and keep it simple. The main thing you need to do is filter out the big stuff, and then purify the water from any lurking bacteria, germs, or other harmful things that could make you sick and do more damage than good.
Filter + Purify = Drinking Water
Ways to FILTER Water:
Filtering is the removal of all “visual” particles and matter from the water such as dirt, leaves, insects, etc so it can be properly purified and then safely consumed.
Basic Filtering Options
The simplest levels of filtration can be achieved by running water through coffee filters, layers of paper towels, a tightly woven cloth, a bandana, or anything that will remove the big stuff you can see. You can also help filter the water by allowing it to settle for awhile to allow the heavy particles settle to the bottom, then pouring the water into another container.
DIY Water Filters
There are plenty of DIY water filters you can find by just searching the internet. The best part is most of them only need a few materials you can find laying around.
- DIY Gravel & Sand Filter – This video demonstrates how to make a water filter using – a bottle, activated carbon, a cotton ball, sand, & gravel.

Ways to PURIFY Water
Purifying is the removal of all “invisible” bacteria, germs and other harmful elements from the water so it can be safely consumed.
Boiling
One of the most common methods for purifying water is to boil it. Everyone varies on how long to boil from 1 to 10 minutes. When water boils, any bacteria that may have been living in it will be killed, thus reducing your chance of getting sick when you drink the water. When done boiling, remove from the heat source, cool and drink. Remember, boiling will not remove contaminants such as heavy metals, salts, and chemicals.
Pasteurization
To pasteurize water it needs to be heated to 149 degrees Fahrenheit for several minutes. A way to check that pasteurization took place is to use a WAPI (Water Pasteurization Indicator). WAPIs are small plastic tubes with industrial grade wax inside of them that melts when water is heated to 150 F for more than fifteen seconds. This method will also not remove contaminants such as heavy metals, salts, and chemicals.
Chemicals
Most people don’t like the thought of using chemicals to purify their water, but in worst case scenarios you may have no other option. When using chemicals you need to make sure you’re using them correctly, and not for long periods of time (usually no more than 3 months).
Bleach – Be sure to use bleach that has no additives, such as scents, soap, or phosphates. Bleach has a very short shelf-life (about 6 months), it loses potency and becomes less effective. Add 1/8 tsp per gallon if the water is clear. Shake it up thoroughly, and let sit for at least one hour before consuming. The water should still smell slightly of chlorine. If you cannot smell chlorine after 30 minutes, repeat the process.
Calcium Hypochlorite – This chemical can purify water in the event of an emergency and can last for 10 years if kept in a cool, dark place. It’s more commonly known as pool shock and a single pound of it will disinfect about 10,000 gallons of water. Be sure to purchase shock that has at least 68% calcium hypochlorite in it.
This is a 2 part process:
- Add one heaping teaspoon of the powdered chemical to two gallons of water and allow to dissolve to make a chlorine solution (this makes Homemade Liquid Bleach).
- Now, add this solution to your drinking water at a ratio of one part solution to 100 parts water (approximately one pint to each 12.5 gallons of water to be disinfected).
To help remove any objectionable chlorine odor, aerate the disinfected water by pouring it back and forth from once clean container to another. It’s also a good idea to have a pool test kit to ensure any water purified with this method doesn’t obtain too much chlorine.
Iodine – This is available in tablet, liquid and crystalline forms. Pregnant women and those with thyroid problems should not use iodine! Also, long-term use is not recommended. Use five drops of 2 percent iodine for each quart of water, or 10 drops if the water is particularly cloudy. Let stand for one hour before drinking.
Chlorine Dioxide Water Purification Tablets – These tablets requires about four hours to react. They have a shelf life of four years when properly stored and can improve the taste of water. One tablet will purify one quart of water, but follow the directions on the package to ensure that you’re using the tablets correctly.
Solar Water Disinfection (SODIS)
The SODIS method uses ultraviolet rays over time to kill bacteria. Use clear plastic bottles and fill them with filtered water. Place the bottles on a dark surface in the sun to increase temperature. Leave in the sunlight for about six hours, or for 2 days if it’s cloudy. You can visit www.sodis.ch for more information about this method.
Distillation
Again, there are numerous was you can distill water and a lot of them you can do yourself. The great thing about distilling water is you can use almost any liquid – including urine and even salt water from the ocean.


Portable Water Filters & Purifiers for Survival:
If you don’t want to be stuck trying to make your own water filter or purifier, here are some of the most popular options below. Each of these are small enough to add to your survival kit or bug out bag so you’ll never have to worry about going thirsty.
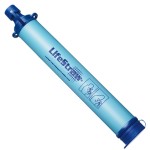 LifeStraw Personal Water Filter
Filters up to 1000 liters of contaminated water WITHOUT iodine, chlorine, or other chemicals. It features a high flow rate and weighs only 2oz. Shelf life has been extended to 5 years. Please NOTE: It takes roughly 3-5 seconds of sucking to start the flow of water through the filter.
 Potable Aqua Water Purification Iodine Tablets
Iodine tablets designed to make contaminated water suitable for drinking. Intended for short-term or limited emergency use only. Water is ready within 30 minutes; neutralizes iodine aftertaste and color.
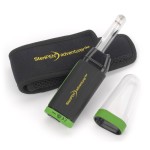 SteriPEN UV Water Filter
Compact handheld UV water purifier designed specifically for outdoor/expedition use; up to 8,000 16-ounce treatments. Safe and effective without altering taste, pH, or other properties of water; chemical-free. UV lamp can be used as an LED flashlight.
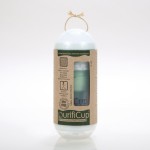 PurifiCup Portable Water Filter
PurifiCup eliminates more than 600 kinds of bacteria, providing you safe and clean water. The silver membrane utilizes silver’s natural anti-bacterial and anti-fungal properties to filter the water, so there is no need for boiling after it is filtered and each filter provides 100-150 cups of pure drinking water. Both a water filter and storage bottle, and requires no hoses or attachments.
 Katadyn Water Filtration System
Combines the two best technologies – ceramic and pleated microfiltration Ultra fast flow (2 liters/minute). Replaceable carbon so water always tastes fresh. Replaceable carbon core reduces chemicals, pesticides and bad taste in water. Output: Up to 2 quart (2 liter)/minute. Cartridge Capacity: Up to 500 gallons (1875 liters), depending on water quality.
 Go Berkey Filtration Kit
This powerful system purifies both treated water and untreated raw water from such sources as remote lakes, streams, stagnant ponds and water supplies in foreign countries, where regulations may be substandard at best. Perfect for outdoor activities and a must in hostile environments where electricity, water pressure or treated water may not be available.
Here’s a handy guide on the Berkey Water Filter that can help explain more!
How Do You Plan to Filter and Purify Water?
Be aware that with most of these methods the water is not always 100% free of chemicals, heavy metals, salt, etc. Even some of the big expensive purifiers can’t remove all the different chemicals. Make sure to do your research on the method you choose to use and pay attention to what may be lurking in the water you plan on purifying.
P.S. Be sure to check out the rest of the 30 Days of Preparedness series:

Thanks for joining the Prepared Bloggers as we work our way through 30 Days of Preparedness. September is National Preparedness Month so you will find everything you need to get your preparedness knowledge and skills into shape.
Take one post each day, learn as much as you can about the topic and make it a part of your preparedness plan.
Day 1 – Ready, Set, Get Prepared! Welcome to 30 Days of Preparedness from PreparednessMama
Day 2 – The Family Meeting Place and Escape from Laughingbear Adventures
Day 3 – I’m Safe! How to Communicate with Family in an Emergency from PreparednessMama
Day 4 – Does Your Family Have a Fire Escape Plan? from Home Ready Home
Day 5 – Preparedness For Pets from The Busy B Homemaker
Day 6 – The Escape Exercise from Laughingbear Adventures
Day 7 – It all Falls Apart Without Mental Preparedness from PreparednessMama
Day 8 – It’s a Matter of Emergency Kits from A Matter of Preparedness
Day 9 – Nine Great Emergency Light Sources Other Than Flashlights from Food Storage & Survival
Day 10 – Cooking Without Power from Mama Kautz
Day 11 – The Importance of a Shelter & Staying Warm and Dry from Trayer Wilderness
Day 12 – The Importance of Having The Right Tools In Your Pack from Trayer Wilderness
Day 13 – Practice Living Without Electricity from Food Storage Made Easy
Day 14 – How We Choose The Right Gear – (including the MultiFlame Tool) from Trayer Wilderness
Day 15 – Water Storage & Purification from The Busy B Homemaker
Day 16 – Food and Water for a 72 Hour “Go Bag” from Homestead Dreamer
Day 17 – 8 Foods You Should Be Storing and How from Melissa K Norris
Day 18 – Planning Your Pantry from The Organic Prepper
Day 19 – Stocking Up on Non-Food Items from Living in Rural Iowa
Day 20 – Dutch Oven Cooking: Off-Grid Before Off-Grid Was Cool from The Backyard Pioneer
Day 21 – Preserving and Canning the Harvest from Timber Creek Farm
Day 22 – Personal Protection & Awareness from Living in Rural Iowa
Day 23 – KISS First Aid from Herbal Prepper
Day 24 – Mommy, I have to go Potty! from Mom With a Prep
Day 25 – Fire Starting 101: The Why and How of Lighting a Fire for Survival from Food Storage & Survival
Day 26 – How to Filter and Purify Water from Prepared Housewives
Day 27 – How To Make A Shelter from Trayer Wilderness
Day 28 – Put Your Preps to the Test with 24 Hours Unplugged from The Organic Prepper
Day 29 – What Is Char and Why You Should Have It To Start A Fire from Trayer Wilderness
Day 30 – How To Utilize Bushcraft Skills and Forage From The Wild from Trayer Wilderness

I always have a bandana with me and usually have a t-shirt on, = filter/strainer. I also keep what I call a fire and water kit in each vehicle. These are small waterproof bags (Wal-mart sells them in 3 packs), the fire part is storm-proof matches (12 second wind & water proof lifeboat type), regular waterproof matches, bic lighter, charcloth, Fero rod, fatwood and Esbit fuel blocks. The water part is a Sawyer mini-filter (100.000 gal kind) along with the cleaning kit, a Katadyn carbon filter cartridge with 2 refill packs. I carry the cartridge empty so I have fresh carbon if I need it. I also have a Steripen I keep with the bike kit. This small bag will fit into a glove-box, but has everything I need to start fires and filter enough water to last a long time.
What a great idea to put a fire/water kit in your glove box. Did you put your kit together, or buy it already made?
Great to hear from you Evil!
I got the waterproof bags at Wal-mart, they come in a pack of 3 for about $10 I think, I used the smallest one for my kits. The other stuff I got separately ( a lot came from Amazon) and put them in the bag. I used the other waterproof bags to keep cloths and other things that I don’t want wet. Work great for small stuff.
Love the site! You should point out that if you want to use pool shock that you need to make sure that the shock does not have algicides or any other active ingredients besides Calcium Hypochlorite. i.e. HTC Pool Shock = Yes HTC Super Shock = No.
HTC shock is only 58% CH so you would use ½ heaping tsp + 1/8 level tsp per Gallon to make your bleach solution. I chose HTC brand for two reasons: First it is available at Walmart for $4-$6. The second reason is they filed with the EPA to be able to claim that one of the uses for their Pool Shock was to treat water for drinking in an emergency.
http://www.epa.gov/pesticides/chem_search/ppls/001258-01237-20100818.pdf {Use 9}
I printed this PDF out because there is a paragraph that tells you how many grains (weight) to use to treat a single gallon of water directly and how to approximate a grain by filling a tiny circle on the form with shock.
In case you are wondering: EPA guideline says 1 “heaping” tsp to 2 Gallons of water. They want 7 grams of 70% CH. There are approx 5 grams per tsp so the “Heaping” is for the extra 2 grams. HTH Pool Shock is 58% CH. To get the same amount of HC you need 8.45 grams of 58% CH. So that’s a Heaping tsp + a level ¼ tsp of HTH Pool Shock to 2 Gallons or ½ heaping tsp + 1/8 level tsp of HTH Pool Shock per Gallon
Thanks for your comment and info about HTH pool shock! I think I need to just do an entire post about this method, because there’s a lot to it. Thanks for linking up to the pdf too. Great info!
Very useful tips for my next camping trip. I’ll buy a lifestraw for sure. Thank you