
I’m starting to understand why people sometimes get the impression that preppers are crazy. Who else does a photoshoot with an aluminum covered box at 3 am? I know, I really need to get a life!
At the Emergency Fair, multiple people told me they had made an AppleBox Oven when they were in Girl Scouts! The only thing I remember from my Girl Scout days was trying to see how many cookies I could sell my mom. The top earner would get a prize and I was so excited when I finally got it one year… a $5 compass (LAME), I haven’t sold a cookie since!
Anyways, if you didn’t have an awesome Girl Scout leader, have no fear. You can make one of these with a box and a few supplies you can find in your neighbor’s trash. Also, don’t feel like you have to do it at 3am, but I think it works better if you do ;)
MAKE AN APPLEBOX OVEN
This is another alternative cooking method and a great way to bake in an emergency! It only uses about 1/2 the charcoal that a Dutch Oven uses and gives the same results as baking in a regular oven! You can bake your kid’s birthday cake, whip-up your famous muffins, or even cook up to 3 loaves of bread in it at the same time! Go ahead and make one, or if you don’t have time, grab the supplies to have on hand for if the power goes out (or if your oven breaks)!
SUPPLIES:
- APPLEBOX – Need top and bottom (20″x 13″ x 12 1/2″)
- HEAVY DUTY FOIL – 1 Wide Roll
- I just walked into HEB and asked for one!
- HIGH HEAT FOIL TAPE
- SPRAY ADHESIVE – I used the Loctite High Performance
- OVEN BAG – 1 oven bag cut into a 10×5″ piece
- BOX CUTTER
- CANDY THERMOMETER – Needs to read up to 400

1- Cut out a window!
Cut out a window about 9″x4″ that is centered, and 2 1/2″ from the top.

2- Cut out the 2nd Window
Place boxes inside of each other, trace the window on the 2nd box, then cut it out!

3- Fill in Holes & Gaps
With the extra cardboard you just cut for the windows, use it to fill in all the gaps and holes on the box.

4 – Tape up Corner/Edges/Holes
Using the High Heat Foil Tape, put it on all the seams, corners, sides, holes, window openings, and anything else that will make it extra durable!

5- Cover EVERYTHING with Foil!
Now it’s time to make your box look like a spaceship!
- Roughly estimate the size of foil you need and tear off a piece.
- Go ahead and mold it gently so it won’t tear when you put it in.
- Spray Adhesive spray on the DULL SIDE (shiny side will show).
- Press the foil on the box and smooth until it is as secure as possible
- REPEAT: Tear Piece, Spray Dull Side, Smooth on Box, do this until the ENTIRE box is covered!

6- Make the Window
Cut the center of the foil, then cut diagonally to meet the center line, repeat this with each corner. Spray the foil inside of the window and fold tabs inside the box, smooth it, and tape if needed.

BOTTOM BOX ONLY:
- Using the oven roasting bag, cut a double layer rectangle.
- 10″x5″ (1 ” larger than window).
- Secure oven bag in place on the OUTSIDE of only the BOTTOM box!
- Use the Foil tape and Stretch it Tightly!
- I accidentally did the inside, but not a big deal.
7 – Put Boxes Together

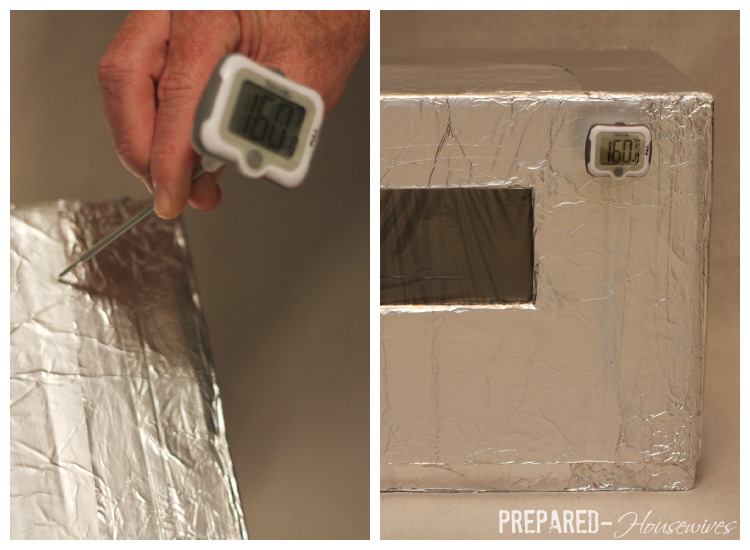
8 – Stick Candy Thermometer Through Box
Put a candy thermometer through both boxes in the upper right hand corner.
COOKING WITH THE APPLEBOX OVEN
SUPPLIES:
- CHARCOALS – About 17 coals for 1 Hour @ 350 (Kingsford Brand is Best :)
- One Year = 22 (16 lb bags)
- Don’t Forget to Store Newspapers & MatchesPOTS & PANS – Make sure they FIT Inside the oven.
- CHIMNEY CHARCOAL STARTER
- LONG-HANDLED TONGS
- MATCHES & NEWSPAPER – To help light the charcoal.
- FOIL OR PAN – To place the charcoals on.
- BLANKET – If it’s cold, place one on top to help keep the heat in.
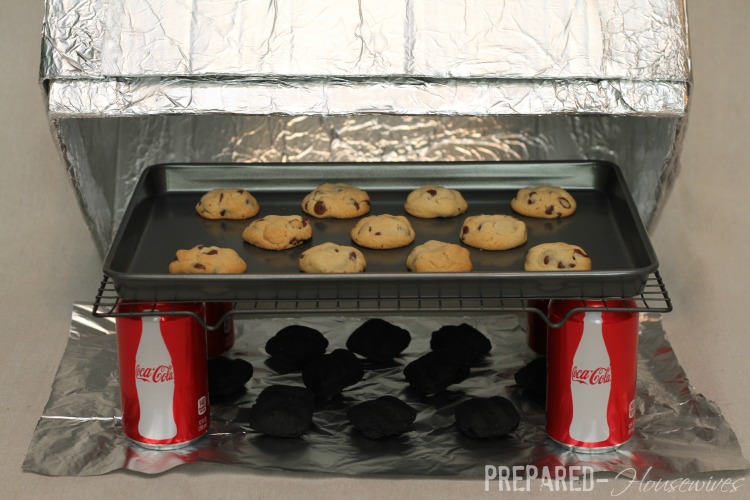
- RACK – Make with:
- 4 empty cans filled 1/2 way with rocks
- Cookie Cooling Rack
1- PREPARE AREA:
- Place piece of foil, shiny side up, on level ground, and on nothing flammable!
- Place cans filled with rocks so that the corners of the rack will rest on them.Make sure the AppleBox oven fits easily over the cans and rack without knocking them over.
- Don’t use full cans, I just didn’t feel like drinking 4 Cokes!

2- PREPARE CHARCOAL
You can control the temperature of the oven by the number of coals you use in it.
- Each coal is about 35 F (350 = 10 coals)
- In very cold weather a couple additional charcoals may be needed.
USING THE CHARCOAL CHIMNEY STARTER*:
- Put desired number of coals into the charcoal chimney.
- Place chimney on a piece of foil on the ground.
- Place a wadded up piece of newspaper in the base of chimney and light.
- Allow to stand 5-10 minutes .
- Wait until all the coals have white spots at least the size of a dime.
- Using tongs, place the hot briquettes on the foil.
- Spread them out evenly between the cans and across the middle.
*A charcoal chimney starter allows you to ignite charcoal without needing starter fluid, using only newspaper! Charcoal rests on a shelf with holes and there is space below for the wadded up newspaper. Place some heavy-duty foil on the ground, then light some newspaper beneath the chimney. You’ll have charcoals ready for cooking in only a few minutes.
3- COOK!
PRE-HEAT OVEN
- Place the Applebox over the coals and the rack.
- Rest one corner of the box on a 1″ rock or something that will leave a little space (this allows enough air in the box for the charcoal to stay lit).
- Let stand for 5 min.
COOK
- Carefully lift Applebox above rack and place on the ground (this will help to hold trapped heat in the box).
- Quickly place the tray of food to bake on the rack and replace box over coals, resting one corner on the rock for air.
- Charcoal will burn for 35-40 minutes.
ADDING ADDITIONAL HEAT
- When longer cooking times are required, additional hot charcoals can be added by slighty lifting the box and slipping them in with long tongs.
- When adding more coals, only add 1/2 the original number.
- SAFELY dispose of charcoal! No burning up church trash cans ;) At least I know what to do if that happens!
EXTRA NOTES:
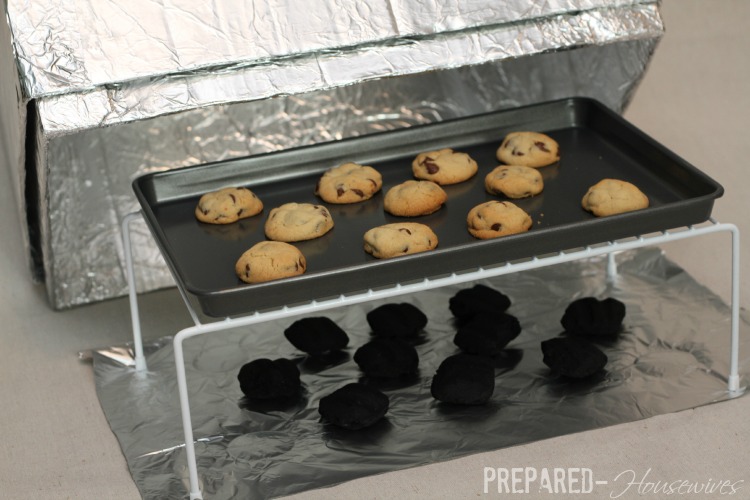
- I found the rack above at Wal-mart that fit perfectly. Yes, it will melt the plastic off, but now I don’t have to worry about drinking 4 Cokes before making dinner!
- Use light-colored pans so that baked foods do not get too dark on the bottom.
- When setting up the oven, face the window toward the sun. This allows you to check the foods visually if it’s done.
- When baking in freezing temperature, place a doubled piece of wool blanket or other material that is insulated on top of the box to retain the inside heat.
Did you ever think this post would end? Neither did I ;)

And for a homemade charcoal chimney, look here:
http://www.your-camping-guidebook.com/charcoal-chimney-homemade.html
Thanks for sharing. I have tonz of cans laying around! I will have to try that next time!
This sounds like a great idea. Does the food have a charcoal taste to it?
I’ve only done cookies with them, but everyone that had one at the fair said they tasted great. They didn’t seem to have a charcoal taste to me. They were much better than the Sun Oven cookies I made. I still can’t get that weird plastic smell out of that thing.
Thank you so much. I am new to your blog. I appreciate all the information on your site. It is fabulous!
You’re sweet! I’m glad you found the blog! Come back often :)
That’s some really great information, I love it! Nice post!
Thanks! It was fun trying it out ;)
Ha! Brilliant! I will have to try this out :-)
Let me know how it goes when you do!
can i do this with my grill?
I’m not sure I understand what you mean.
– Put a grill in the box?
– Or use your grill instead of a box oven?
sorry, i meant use my grill. it was a gas grill,when the fittings burned out we put charcoal in it. can i bake in there?
Yes, my neighbor used her grill for baking pizza and whatever she had in her freezer when the electricity was out for 2 weeks! You’re right, it’s kind of the same concept as the box oven. The grill will just use more charcoal, so if you want to preserve it, then the box maybe a little more efficient.
o yes! dah… use less, of couarse. thank you
Awesome! My cookies tasted great! I can’t wait to use it at our camp.
Good to hear!!!
this is awesome, i dont have an oven anymore and have been dying to make some good homemade bread and cookies, mi gonna be daring and even try a cake!
This does work. I used to teach Cub Scout leaders how to do this back when I was a Boy Scout. However, it need not be this complicated! If your goal is to make an oven for long term use then definitely follow all the instructions above. You’ll have a charcoal oven that will last quite a while, but if supplies are limited (like you weren’t prepared to build a complicated oven out of a cardboard box when the storm hit & took out your power) it can be made much simpler.
First of all, if you don’t have a big apple box pretty much any reasonably sturdy box (shoe boxes do not qualify as ‘reasonably sturdy!) will do as long as it’s big enough to fit over whatever you want to cook while leaving several inches above & below the food. You do need a place for the charcoal to go after all. Also, the oven need not be double walled. If you’ve only got one box or a limited supply of aluminum foil you can make a functional oven by covering just the inside of a single box. Obviously it’s not going to work as well or be as efficient as the one pictured above, but it will work. I’ve cooked many a peach cobbler under a single aluminum foil covered cardboard box. You can even get by without the roasting bag window if you have to. Ditto for the thermometer. I don’t recommend it. Doing so significantly increases the chances of burning your food, but if you don’t have one you don’t have one. In an emergency you can bake an entire dinner under a just single cardboard box with its interior covered in aluminum foil.
One more thing, if you are doing this as a cooking method in an emergency or just to try it out on your next camping trip, unless you intend to reuse your cardboard box oven, and therefore need the versatility of a larger oven, you should match the size of the box to the food you are cooking if at all possible. You’ll use less resources that way. If all you’re doing is cooking yourself a frozen dinner using a box big enough to cook a 20lb turkey in is unnecessary and will require more charcoal to get up to temperature than a small box would.
I’m glad you mentioned that there are simpler ways. After posting this I found a few that were super simple like you mentioned. They may not be as efficient, but when you need something to eat, it doesn’t matter!
Great cooking suggestions! Thanks for taking time to comment.
Can I use my baking stone in this?
I only have one problem…. you have all of these wonderful instructions, but I have not figured out how to print them out. They won’t do me any good on the computer without power which is when I’ll need them. Suggestions?
I feel honored you want to print this out ;) I just went ahead and added the option to print. Go to the bottom of any post and under the related articles you will see “Share This”. Click the 1st option which is a printer and it will allow you to print the post. I would probably recommend doing it double sided or 2 pages to a sheet. Make sure to preview what will be printed and only print the pages you need (just so you don’t end up with everything that is on the sidebars)!
My oven is broken and I would love to make this. Is there a link to print it out so I can make it away from the computer?
It looks like a great idea!
Thanks!
I feel honored you want to print this out ;) I just went ahead and added the option to print. Go to the bottom of any post and under the related articles you will see “Share This”. Click the 1st option which is a printer and it will allow you to print the post. I would probably recommend doing it double sided or 2 pages to a sheet. Make sure to preview what will be printed and only print the pages you need (just so you don’t end up with everything that is on the sidebars)!
English muffin pizzas are yummy and they cook much faster than expected. Nice box oven!
Awesome! Good to hear! Trying those out the next time I cook with it!
Looks like the same concept as my charcoal grill. I’d never thought of making cookies on it though… I’ll have to remember that! =)
Some years back (’90s), the power was out for 3 days in the winter (in VT) and my Mom made pancakes from scratch on the grill. She had a lot of people scratching their heads when she told them that! They would always ask: Wouldn’t pancake batter just fall right through? (Hint: She had a grill safe cookie sheet!) lol
Yep, you could do the same thing with your charcoal grill. You might just need a few more coals, but same concept.
I’m going to have to try pancakes! Great idea!